How To Aim A Bow And Arrow. Archery Aiming Methods.
![]()
In this article we will look at the how to aim a bow and arrow in detail, both with modern techniques and traditional methods.
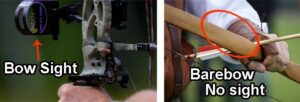
There are two basic ways of aiming the bow. 1. With a bow sight. 2. Without a sight, which is called barebow.
For barebow shooting, the archery aiming methods are broken up further into five main techniques. They are; 1. Gap Shooting. 2. Instinctive Shooting. 3. Face Walking. 4. String Walking. 5. Point Of Aim.

These methods can also cross into each other and not every archer agrees about the correct name or specific technique. But let’s move on and look at different ways of aiming the bow.
With some of these traditional aiming methods, they can be broken down again into further groups. Such as for gap shooting, it can also be divided into gapping off the arrow, gapping off the bow’s riser, split vision, etc.
These aiming systems can all be used for any types of bows, whether it be, compound, longbow or recurve bow (Although some would consider it improper to put a sight on a longbow.)
Bow sights.

I remember taping a pin to the bows riser as a boy, this was my first introduction to bow sights.
Using sights on a bow can be one of the most consistent forms of aiming in archery. Especially at longer ranges, as you have something tangible to use.
There are a wide range of sights from multiple pin hunting sights, to single pin target sights.
Generally the bow sight is used on a compound bow, or on an Olympic style recurve bow.
When you combine a compound bow with a release aid device and a peep sight, you can achieve reasonable accurate shooting, which is quicker to learn than barebow techniques.
This of course depends on the archer and their practice. But generally using bow sights are the most accurate way of shooting a bow at longer ranges.
(Having said that, there are some extremely good archers who are very accurate without sights, both in target archery and bowhunting. Plus barebow archery is a lot of fun.)
One negative of using sights for bowhunting is that the bow sight can sometimes obscure the target and a little bit slower acquiring the target, compared to some other ways.
The peep sight and bow sight.
A peep sight helps increase accuracy with a bow sight. In the same way as the front and rear iron sights of a rifle.
The peep sight inserts into the bowstring.
When they archer is at full draw, they look through the peep sight and line it up with the front bow sight. The front sight pin is then lined up with the target. Again similar to the front and rear sights of a rifle.
Peep sights come in different sizes and materials.
Target archers prefer a smaller hole peep sight for accuracy. Bowhunters might select a larger holed peep sight, as it can let more light in for low light bowhunting at dusk and dawn.
The archer may not use a peep sight, but instead line up and sight the bowstring to the left or right of the sight pin. Or use the bowstring on their nose or some other reference point to help increase consistency in their form.
Before peep sights on compound bows were popular, aligning the bowstring to the right or left of the bow sight pin was common.
Olympic archers aren’t allowed to use a peep sight on their recurve bow. (Or a release aid device. With the exception of the 2020 / 2021 Tokyo Olympic Games were the compound bow will be trialed.) They might use a kisser button, or use anther reference point. Such as the string on the side of their nose or on the tip of the nose.
How to use a bow sight?
A low anchor point is used with sights. Such as under the chin or at the corner of the mouth.
With a release aid device, the bowstring is normally anchored around the corner of the mouth. If using a finger release style, a split style release is normally used. (The index finger is above the nocked arrow. The middle finger and ring finger is below.)
When the bowstring is drawn back at full draw and you have a consistent anchor point, look through the peep sight.
The hand that holds the bow, (Called appropriately the bow arm.) with this same side you will close that eye.
(As an example if you are a right handed shooter. You hold the bow in your left hand and draw the bowstring with the right. Your left eye will be closed.)
When you look through the peep sight, you align the front pin of the bow sight up. This front sight pin is positioned on the target. So you have three items lined up with your eye, the rear peep sight, the front bow sight and the target.
(If you don’t use a peep sight, you might have the bowstring, bow sight and target lined up. Or just the front bow sight and target aligned.)
There is also two ways of focusing with the sight.
Some people might focus solely on the bow sight pin. The pin is clear, but the target is out of focus. The second way is to focus on the target and the sight pin is unfocussed and more in the peripheral vision.
I would say most bowhunter focus on the game or target and the pin is in their secondary vision. As this helps see what the animal is doing. As an example the deer is looking at the archer, so the bowhunter knows not to move.
Try both ways of focusing for yourself. It might depend on your vision and technique.
With rifle shooting with iron sights or handguns, a lot of shooters focus on the front sight.
For archery, the target is generally in focus and the front sight pin is secondary. I have heard that archers prefer concentrating on the target, as the bow moves around a bit.
Most people will close one eye, but some archers keep both open with bow sights.
The bow will generally be held vertical, or straight up and down when using bow sights. As opposed to canting the bow.
With the bow sight, the pin is set low down for longer distance targets. This elevates the bow and arrows aiming trajectory.
For closer distance targets the pin is set higher on the riser.

For a bowhunting sight with multiple pins, you might have the lowest pin set at 50 yards. (Or meters.) The next pin set at 40 yards, then 30 yards. The very top pin is set at 20 yards. This example will depend on your bow and arrow set up, like arrow weight, bow poundage and arrow speed. As well as how many pins you have on your sight and your preferred shooting distances.
Bowhunting sights and compound target sights, might have a bubble level on them. So you can make sure the bow is vertical and not canted. (Olympic archery style bow sight are not allow to have a bubble level on them.)
Barebow shooting techniques. Methods of aiming without a bow sight.
Within the barebow category, as mentioned there are basically five methods of using different aiming systems without a sight.
Those are, Gap Shooting, Instinctive Shooting, Face Walking, String Walking and Point Of Aim, methods of shooting.
With archery’s long history, different languages and styles, not all barebow archers agree to the exact terminology of each method. But before we go into finer detail, here is a quick overview of the aiming methods.
A lot of these barebow techniques, use the arrow tip as an aiming method. Which gives the archer a more consistent sight picture.
Gap shooting.
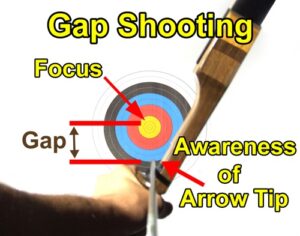
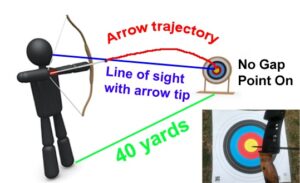
With gap shooting, you use the arrow point as a sight or reference. You focus on the target and the arrow point is referenced, but not in focus. The arrow tip is in your secondary vision.
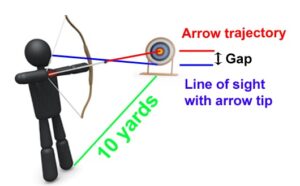
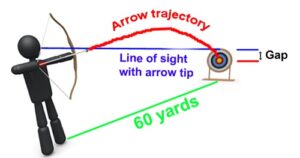
The difference between the arrow point where you are aiming and the target you want to hit is called the gap. The amount of gap to use will depend on how far away the target is.
There are many variations of gap shooting and ways to utilize the aiming system.
With some gap shooting you can also use marks on the bows riser, the arrow rest for aiming. Or even use parts of the hand for reference at longer distances.
Instinctive shooting.
For lack of a better term, instinctive shooting is basically concentrating on a spot and releasing the arrow with no conscious aiming method, or conscious thought as to the distance to the target.
Face walking.
In face walking, you anchor on different points on your face, depending on your distance to the target.
You use the arrow point on the target, like a front sight.
If the target is a long way away, you anchor low. So the arrow is pointing up and the trajectory is up.
For a target close by, the anchor point might be high up on the cheek bone. The arrow is pointing down more.
String walking.
For string walking the point of the arrow is always on the target and you anchor in one spot.
However, you adjust for elevation by the bowstring hand being placed differently on the string, (Called a crawl.) depending on how far away the target is.
Point Of Aim Shooting (A Pick a Point).
Point of aim is similar to gap shooting, however you focus on the tip of the arrow exclusively and not on the target.
Depending on the distance to the target and anchor point, the arrow point focus might be several feet below the target on a rock.
For target shooting, you might even place a marker on the ground for a point to aim at.
Can I use a compound bow without a sight?
Yes, you can use a compound bow with no bow sights.
However, because of the short axle to axle length a modern compound bow, they are very hard to shoot with fingers. When at full draw, the short length of the bow creates a very sharp angle of the bowstring which will pinch the arrow and makes a clean release of the bowstring hard. This is why a short compound bow is best used with a release aid device. And generally if you have to use a release device, then a bow sight goes with it.
Some older models and the best target compound bows are generally longer in length and some of these are okay for using with fingers. Probably bows over 37 inches length axle to axle, preferably around 40 inches or over are better with finger shooting. (I love shooting fingers and barebow style with a longer compound bow.) I have shot compound bows with fingers, with a compound bow length of 32 inches and is very hard to get a clean loose. (Release.)
Conclusion. – You can use a longbow recurve or compound bow with all these barebow aiming techniques. But a compound is best used with a release aid device because of the short length. And a release aid generally goes with a bow sight. (With the exception of Olympic archery style recurve bow that uses sights. But no release aid device is used.)
Finer details on methods of aiming.
Now we have roughly covered the different ways, let’s look at each shooting technique with more detail and also cover some archery tips.
The bow can be held on a canted angle, or a vertical hold when aiming with a lot of these barebow methods. However, for string walking and face walking the bow is best held vertically. A lot of good target barebow shooters will also hold the bow straight up and down.
Instinctive Shooting.

Instinctive shooting is basically concentrating on a spot and releasing the arrow with no conscious aiming method, or conscious thought as to the distance to the target.
Some say they feel that the bow hand in relation to the target and when it feels correct they will release.
Others say they burn a hole with intense concentration on the spot they want to hit. Some archers compare it to throwing a ball and state you just do it. With practice your hand and eye coordination compensates for distances.
Instinctive shooting is a hotly debated on how effective it is, how exactly it is done and even the archery term instinctive, is debated. Maybe because instinctive shooting is hard to explain and there is a lot of mystique surrounding it.
Sometimes instinctive shooters will reach anchor and then release, other instinctive shooters might hold for a couple of seconds then release.
One benefit of instinctive shooting is that with proper form it can be a very quick method of getting an arrow to the target and the distance doesn’t have to been known.
Instinctive shooting is generally best for very close ranges.
One drawback is that accuracy may suffer for long distance shots. Of course there are exceptional archers who practice and use this method with great accuracy, however for most it requires a fair amount of practice and is generally more suited to very short ranges.
Some archers who need a more conscious or definite method of aiming, find instinctive shooting hard to shoot consistently, or to be accurate at longer ranges. For becoming more efficient quicker, maybe learning gap shooting with the arrow tip as a reference point and using three fingers under, might be a better option, rather than pure instinctive shooting.
For those still interested in learning some finer points about instinctive shooting, G. Fred Asbell has some books on it.
Gap shooting. How to aim the bow and arrow with gap shooting.
Gap shooting has many variations within its style. Some methods are similar, but have a few tweaks that can make it a different method.
Gap shooting is basically using the point of the arrow as a reference to the target. Which the arrow tip could be slightly below the target, on it or above the target depending on the distance.
When the arrow point is above or below the exact target, this distance is known as the “Gap.”
When the arrow point is exactly on the target and your arrow shoots there, this is known as “Point On.”
Most gap styles don’t solely concentrate solely on the point of the arrow, but instead concentrate on the target and the arrow tip is in the peripheral vision.
For close range targets you concentrate on the spot you want to hit and your arrow tip is below the spot you want to hit. For longer distances you concentrate on the spot you want to hit, but your arrow tip is above your target.
Howard Hill used gap shooting or a variation of it. It is also known as split vision, where you focus on the target, but in your secondary or your peripheral vision, you know where the point is.
Gap shooting or split vision is good for bowhunting as you can see what the game animal is doing, but you still have a reasonable accurate method of aiming and reference point.
Some archers argue that split vision is separate from gap shooting. Perhaps it is the degree at which you see the arrow, secondary in your vision.
Initially I had a hard time understanding gap shooting, so another way to think about it, is to picture a bow with a single pin sight on it.
This single pin sight cannot be moved and is set, to say 30 yards. At 30 yards you could put the sight on the target and with good form hit the target.
For targets closer you then 30 meters, you place the pin under the target. For targets further away than 30 meters, you put the pin over the target.
Now instead of picturing the single pin sight on your bow, take the sight away and replace your pin sight with the tip of the arrow. Depending on the distance to the target that is your reference point, or gap and you don’t solely concentrate on your arrow point, but it is just in your split vision or peripheral vision.
One important piece of gap shooting is to know your point on distance.
Point on, is where your tip is on the target and you hit the target where you are aiming.
An example, your point distance might be 40 yards. If you put the arrow tip on the target spot at 40 yards, (And your form is good.) you will hit that spot where you are aiming.
If you are closer, say 30 yards then you aim with your arrow tip on the center of the target, this time the arrows will hit high.
So if you know that your point on is 40 yards and you are at 30 yards, you would aim the arrow tip lower than the center of the target. (You are concentrating on the center of the target, but in your secondary vision the arrow point is aimed lower than the target spot.)
If the target was is 50 yards, but you aim your arrow point on the center of the target, the arrows will go low. As the trajectory of the arrow is dropping in an arc.
Of course your point on and gaps will depend on your bow arrow set up, bow poundage, anchor point on your face and whether you have a three under or split fingers, etc.
Using three under with a higher anchor point is generally easier to learn gapping with. As you have a closer reference point, depending on the distance to the target.
Gap shooting using the riser.
There are many variations of gap shooting, another way to learn how to aim a bow and arrow is by using the riser and arrow rest to help aim.
Some archers use the arrow rest or shelf as a reference point, instead of their arrow tip.
Others use a mark or marks on their riser, this is called “gapping off the riser.”
Some wooden risers have natural wood grain marks that can be used for sighting references.
I have heard of some archers deliberately creating gouges or marks on the riser for sight references. Some target archery organizations won’t allow a marked bow riser.
Metal risers with cut outs and designs can also be used for reference points. Some exclusive bow designed for barebow archery have a number of cut outs and marks that are handy for sight references.
I have heard of old traditional longbows being found and they have marks on the bottom limbs. Historians and archers believe the marks are a sighting reference. So when the archers were in the battlefield, they had an aiming point. The archers would have to aim high up, for the arrow trajectory to hit the enemy soldiers at a distance.
Gap shooting using close distance.
A variation of gap shooting is using the gap at the arrow tip.
Instead of visualizing the gap or arrow point a certain distance under the target, you use visualize the distance from the arrow point at the end of the bow.
One negative is that it is easy to lose focus of the target and end up looking at the tip. Which ends up making this technique more of pick a point system if you don’t do it correctly.
Another way to describe it is, instead of holding say 8” under the target at 17 yards, you visualize at the arrow tip 2” under.
Gap shooting using the arrow diameter.
A variation of gapping is, instead of using inches or a measurement, you use the diameter of the arrow.
An example could be at a target at 25 yards, you place the tip of the arrow two diameters under the target.
You can use this technique to visualize the diameters on the target, or like above, visualize from the arrow tip.
Understanding gap shooting. How to find and measure your gaps.
The better form and consistency you have in your shooting, will give you more accurate results. (As well as having a well-tuned bow setup.)
Here is one way for finding the gap measurements.
I place a 2” orange colored dot sticker on a big flat piece of cardboard.
(The orange dot makes it easier to see. Obviously you could use yellow, white or black if that stands out more on the target face. )
This cardboard is then placed on the target butt. This cardboard makes it easier to measure the distance from the aiming spot to where the arrows land.
I then measure out 5 yards. (Or you can use meters.)
Aim the arrow tip on the orange dot and fire three arrows.
The arrows will probably land high on the target face, above the orange dot.
Measure with a tape measure the distance from the orange dot to where the middle of the arrow group has landed.
Write this down on a notepad, or smart phone. (Or you can take a picture, so you can see the tape measure marks. Use a sharpie and write down the distance. Once you have the photo, cross the distance out on the target face. This so you don’t get confused with the next image. Taking a photo is also a good way to look at how close your groups are. You might repeat this process in three months and compare iages.)
You might record something like this 5 yards = 18 inches high. (This is just an example and your bow and arrow group will be different. As anchor point, bow poundage, arrow length, arrow weight, etc., will affect the results.)
If your arrow group is too wide to get an accurate measurement. Shoot another group.
Measure out 10 yards and fire three arrows. Record the results.
Measure out 15 yards and fire three arrows. Record the results.
Measure out 20 yards and fire three arrows. Record the results.
Repeat the process for 25, 30, 35, 40, yards. You might record 45, 50 yards or longer if you like.
For the close distances, your arrows will land high on the target, above the orange dot.
For the longer distances, your arrows will land below the orange dot.
You will get to one distance that your arrows land on the orange dot. This distance is you “point on” distance.
After you have shot and recorded your distances you might have a list like this:
5 yards = 18 inches high.
10 yards = 16 inches high.
15 yards = 12 inches high.
20 yards = 9 inches high.
25 yards = 4 inches high.
30 yards = 2 inches high.
35 yards = 0 *Point on distance.
40 yards = 8 inches low.
45 yards = 17 inches low.
(The measurement probably won’t be linear. As the arc of the arrow drops off dramatically towards the end of its flight trajectory.)
Now here is the interesting thing about gap shooting. The height that the arrow lands above the dot, is the measurement you have to aim under the target dot to hit it.
Another way to put it is: Say your arrow lands 12 inches high above the orange dot at 15 yards. To shoot the orange dot at 15 yards, you aim 12 inches low below the orange dot.
Another example is if your target is at 40 yards. If you aim the arrow on the orange dot your arrows will land around 8 inches low. So to hit the orange dot, you aim the arrow 8 inches above the orange dot.
For the longer distances, it will be harder to get an accurate measurement, so you might shoot five or six arrows. If your groups are messy, repeat the longer distances again.
The simple gap method for bowhunting.

Another variation for gap shooting, is what I like to call the simple gap method.
This is good for close range hunting with heavy arrows. You just have three main gap references or sight pictures.
As an example, from distances from o to 15 yards, you might hold the arrow broadhead tip several inches under the deer’s vitals.
For 22 yards, this distance is your “point on distance” for your bowhunting rig, so you place the broadhead tip on the deer’s vitals.
For 30 yards, the tip is placed on the deer’s back.
Of course this will depend on your bows poundage, arrow length and weight, bows speed and anchor point, etc. However, this method is great for keeping things simple, rather than trying to remember 6” under for 8 yards, 5” under for 10 yards, 4” under for 12 yards, etc.
With the simple method, you can get a quick sight picture. With quality practice this method can be very accurate.
If you are know that the average distance that you encounter (Tree stand or blind pit, etc.) and shoot at deer is say for 20 yards, you might use a heavy arrow or a very heavy broadhead to get point on at that distance.
Likewise if you are field or target shooting at longer distances you might try and get a very flat shooting bow and arrow set up. You might have 4 simple sight pictures that help you cover those unknown groups and distances.
Say your average target distance is 38 yards, try to get your point at that distance. (The targets might range from 8 yards to 52 yards as an example.) you might try using lightweight arrows. (Still with correct arrow spine and bow tune.)
Point Of Aim Shooting. (Pick a Point.)
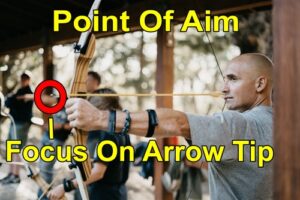
Another way to learn how to aim a bow and arrow, is with point of aim shooting. With point of aim, you focus on the tip of the arrow exclusively. You use the arrow tip as a fixed front sight, which may be below, on or above the target, depending on the distance to the target.
You have to measure and know how high or low your arrow will hit a certain distance. As an example at 20 yards you have to aim at the base of the target butt or lower to hit the center of the target. At 40 yards your arrow might hit where you aim. At 60 yards you might be aiming the arrow point on the top of the target butt to hit the center of it.
For bowhunting, point of aim would be a bit cumbersome. Because it is better suited to target archery at longer distances, you might use a low anchor point underneath the chin or on the corner of the mouth. Generally a split finger release (Mediterranean style release. On the bowstring, one finger is over the arrow nock and two under it.) is used with point of aim shooting.
For consistency in point of aim shooting, the arrow tip may be aimed on a stationary object.
An example might be, you pick a distinctive colored pebble on the ground 5 yards in front of a stationary target.
You aim with the arrow tip on the pebble, concentrating like using a sight on the pebble. Your arrow might hit the target a few inches high, so you then see a clump of dirt a few inches in front of the pebble. Now you solely concentrate aiming using your tip on the clump of dirt, ignoring the target. You release and hit the target, so you now use the clump of dirt exclusively for that distance to your target.
You might even use a tennis ball, golf ball, witches hat, or some marker that you can see and easily move for an aiming point.
Point of aim can be used for indoor target archery effectively. With heavy arrows you might use the target rings, like the bottom red or blue as an aiming point. For longer distances you could use the top of the target butt for a consistent reference spot.
The point of aim method is probably the opposite of gap shooting as far as your concentration goes. The sole focus is on the arrow tip, so you may not even be aware of the target in your peripheral vision.
Point of aim shooting method can help you train for gap as well.
As you can use the arrow as a guide and then slowly concentrate less on the arrow and more on your target. It also can be a good general method for some to practice your form as you are not specifically concentrating on your specific target.
Point of aim (Or pick a point.) should not be confused with “Point On”. Point on is when your arrow tip is on the target and your arrow will also hit the exact same spot.
Face Walking.
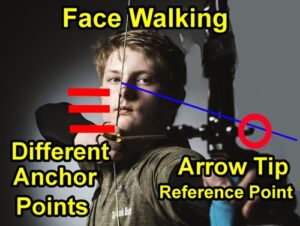
In face walking, you anchor on different points on your face, depending on your distance to the target.
The arrow point is used as a front sight pin on the center of the target.
For close distances you might anchor high on the cheek bone, which angles the arrow down more. For long distances you can anchor under the chin. Which angles the arrows trajectory higher so it can fly further and reach the target.
Another way to think about face walking is to picture it similar to rifle shooting with iron sights. Instead of adjusting your rear sight up and down for elevation, you just anchor higher or lower on your face depending on your distance to the target.
As well as the different anchor points, you can also use split finger (Mediterranean style release.) or three under release. (Apache style release.) Or use a combination of these for different distances.
You might have four anchor points as an example. 1. From a high cheek bone anchor with three fingers under. 2. An anchor on the corner of the mouth with three under. 3. The same anchor point is used, but you use a split finger release. 4. The last anchor is low under the chin with split fingers.
You can have more anchor points than this example. But it just shows some variations and ways to manipulate the arrows trajectory combined with different anchors points on the face.
One consideration with face walking is most people’s face are angled, so it can affect left and right alignment. A high up cheek bone, with a three finger under anchor is going to be slightly different to under the chin split as far as left and right orientation. So you might have to adjust for windage (Left and right.) depending on the height and distance to target.
Face walking can get complicated and it can be easy to forget all the different anchor points for the different distances. So record them in a notebook, or smart phone for reference.
Bow tuning can be harder to do as you have different anchor points and slightly different draw lengths. The three finger under style compared to the split finger release also can negatively affect your bowstring nocking point and hence the tune of the bow.
One advantage of face walking is the wide range of distances you can shoot. For barebow shooting, face walking excels at long distances. Like all archery disciplines, quality practice and good form is essential.
String Walking.
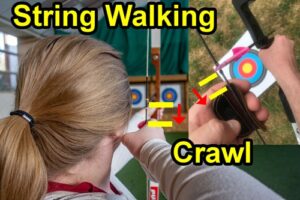
In string walking the point of the arrow is used on the target for a sighting reference.
You adjust for elevation by the bowstring hand being placed differently on the string, (Called a crawl.) depending on the distance to the target.
The arrow is nocked in the one place on the bowstring. However, you bow string hand moves under the nocking point on the bow string, either up or down, depending on how far you are to the target.
For an example, at 45 yards you’re drawing hand that is on the bowstring might be located on the string one inch under the nocking point.
For a five yard shot, your bow string hand might be located 6 inches down from the nocking point. Thus putting the rear of the nock end of the arrow higher and point lower to compensate for the trajectory.
“You always anchor in the same place on the face and the arrow is nocked on the bowstring in the same place. But your bowstring hand moves up and down the string, depending on the target distance.”
Another way to put it, is to think string walking like having a bow sight on the rear of the bow string. You select the distance and your bowstring hand goes on the bow string where the imaginary pin would have been. In this case though, you are moving your arrow up and down the string, by gripping the bow string in different set positions.
Depending on rules for, most tournaments won’t allow tabs with marks on them or the bow string marked. However for bowhunting some string walkers may have a tab with marks indicating distances on it, or some serving material on the bow string to indicate different distances.
Some string walkers place the tab underneath the nocked arrow and count the stitching on their tabs. The stiches will relate to a distance, such as three stiches is five feet difference in elevation. That point is referenced and then they slide their fingers down to that point.
One benefit thing about string walking is you have a fixed method of aiming as your point or tip is on the target and this helps minimize windage (Left or right aiming. Not taking into account tuning issues.) calculations. Such as the arrow is not a foot under the target and may be slightly to the left or right of the target that might happen in using the riser for gap shooting.
Tuning the bow can be an issue for string walkers. So some archers might tune the bow for the middle distance of the targets. Or for slightly longer distances as this can be more critical for accuracy.
Some people don’t like this method for bowhunting as the tune of the bow will be different from say 10 yards to 35 yards. Whilst at full draw your release or bow string hand will be closer to the bottom limb, effecting the draw length of the arrow, thus effecting arrow spine.
A nock set above and below the arrow nock on the bow string should be used, as this stops the arrow from sliding down the string upon release. Visit Nocking Points And D-loops for more information.
While string walking may not be for everyone, it can be a very accurate method of barebow shooting.
Ty Pelfrey has some great information on string walking in the, “Masters of The Barebow” series on DVD, and also “Modern Traditional.” Ty also uses string walking for bowhunting.
Barebow and gap shooting tips.
You can manipulate your point on distance with longer arrows, heavier / lighter poundage bows, heavier / lighter arrows and trying different anchor points on your face.
Try closing one eye, compared to both eyes open, to see if that helps your shooting accuracy. Although for bowhunting, some archers prefer both eyes open to observe things easier.
For an extra reference for an anchor point, try setting the fletching so it touches your nose. When at full draw and I expand on back tension, when the feather touches my nose, I release the arrow.
For leaning gap / face walking and string walking, you can always write down the distances / gaps on a piece of tape and stick it to your lower limb. Of course this may not be allowed in competition, but for practice it helps.
When you get confident at set distances, try stump shooting. Use a judo point or similar blunt arrow, so it doesn’t get lost in the woods. Stump shooting at a clump of grass or a fallen colored leaf is an enjoyable way of practicing at unknown distances in a relaxed environment.
Just an interesting note about gap shooting and instinctive shooting, I think it was Larry Yien was talking about the more you practice gap shooting, your bow arm just automatically sets the gaps and it becomes more instinctive in a way. Bryon Ferguson also mentions a similar thing happening.
Aiming with the arrow insert or end of the shaft, might be easier for some, rather than use the very fine tip or broadhead of the arrow.
Use white paint on the end of the shaft and insert to help the increase the visibility for aiming. It will eventually wear off with repeated shooting. But it is good in low light for bowhunting, such as at dusk and dawn.
For getting the most accuracy for shooting, (Using bow sights or barebow.) one solution is to practice on achieving a good solid anchor point, is to work on blank bale shooting. Which means you don’t put a target on the butt. Stand close to it and just work on good form and consistency. Don’t aim, just go through each motion of stance, knocking the arrow, draw cycle, aim, back tension and expansion, release, hold the bow arm steady on target after release, etc.
Remember to pick a spot when aiming for all methods of aiming. Aim small and miss small. If you just aim at the side of the barn, you arrows will go everywhere. But if you aim for a tiny spot, you are more likely to hit it or get close to it.
When you are aiming and the target hasn’t got a spot you can easily aim for, (Like a light spot on a 3D target, or tuft of dark hair on a game animal.) one technique is to visualize a small orange dot on the target. It does take a bit of practice, but helps with something to concentrate on the target.
For barebow shooting, some archers might use a combination of archery sighting methods.
As an example, they might use a gap method or instinctive shooting at ranges from say 5 to 10 yards. For longer ranges from about 15 to 40 yards, they might use a gap shooting method. Then for a longer distances, were the archer can’t see the target, because bow hand obscures it, they might use a leaf on a branch with the point of aim method. For very long distances, the archer might revert to face walking and have a low anchor to help them get to the target.
Remember to use whatever method you feel comfortable with, that gives you an acceptable level of accuracy for your objectives.
Drawbacks of using the arrow tip as a reference.
One disadvantage for all methods of using the arrow point as a reference or front sight is if you have an inconsistent anchor, your draw length changes. This means your arrow point reference changes as well.
As an example if you draw shorter, your arrow tip isn’t in the exact same point for aiming. This means the arrow protrudes more and you lower your aim. This has a twofold negative effect on accuracy. As you are holding a lighter poundage, the arrow won’t travel as fast. You are also aiming lower, which compounds the aiming error.
Likewise if you draw the arrow back too far with an inconsistent anchor point, the arrow point is closer to the bows riser and you raise the bow so the arrow is referenced on the target. With a higher aimed trajectory and a longer draw length, the arrow will go faster and further, hence causing more accuracy issues.
When using sights an inconsistent anchor point will affect the archer, bow and arrows accuracy. But using the arrow tip as a front sight / reference point can magnify that error more.
Conclusion. – How to aim a bow and arrow.
There are plenty of ways to get maximum accuracy in line with skill level, equipment and enjoyment of the bow. Regardless if you are bowhunting, 3D, field or doing target archery.
Some of the above ways of aiming might be complicated but extremely accurate, other ways might be very quick but not effective for long range shooting. Like most things in archery, there are trade-offs and aiming the bow with different methods is the same.
No matter what your aiming type or style, without good consistent form and practice, no method will be regularly accurate. It is said that an archer with good form can adapt to any method, style and make it work.
Try some different aiming methods to suit your goals.
Don’t be afraid to play around with a few different methods of learning how to aim the bow and arrow. You can easily go back to your old way if you like.
While some aiming methods might not be for you, understanding the different aiming methods gives you more options to choose from and a respect for the different archery styles.
Archery references and resources:
Hitting them Like Howard Hill, by John Schulz.
Shooting The Stickbow, a Practical Approach To Classical Archery, by Anthony Camera.
Become The Arrow, by Bryon Ferguson.
“Masters of the Barebow” DVD series with Rod Jenkins and Larry Yien.
Jimmy Blackmon has some great information on gap shooting on YouTube.
Understanding Winning Archery, by Al Henderson.
The Simple Art of Winning, by Rick McKinney.
Hunting The Hard Way, by Howard Hill.
Modern Traditional, (DVD) by Ty Pelfrey.
Instinctive Shooting, A Step By Step Guide To Bowhunting, by G.Fred Asbell.
Instinctive Shooting 2, by G.Fred Asbell
Instinctive Archery Insights, Accelerated Learning Through Applied Psychology, by Jay Kidwell Ph.D.
Instructional Shooting Hunting, Vol 2, by Rick Welch.
The Competitive Archer, by Simon Needham.
Archery, The Ultimate Resource For Recurve and Compound Archers, by USA Archery.
Archery, Steps To Success, by Kathleen Haywood and Catherine Lewis.