How To Tie A Kayak To Roof Racks. Step By Step.
There are multiple ways you can tie a kayak or canoe down on the vehicle. But it should be done securely. Read on to learn how to tie a kayak to roof racks the correct way.
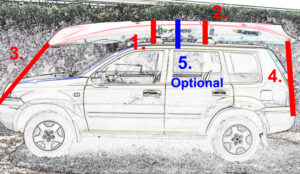
Regardless of the types of roof racks and supports, like saddles or J cradles, there should be four or more points of contact to the car for safety. Two straps in the middle and a bow and stern straps/security lines.
Here is how to tie a kayak to roof racks. It is a seven step system. As well as some tips for securing the kayak down.
- Check roof racks are secure, before even loading the kayak.
- Load kayak so it is balanced evenly on the racks.
- Tie the middle two straps to the roof racks.
- Tie the bow line down.
- Fix the stern strap.
- Optional – fifth strap for longer distances.
- Check the straps often when traveling.
More detail on how to tie a kayak to roof racks.
Now we will go over the steps in a bit more detail.
1. Check roof racks are secure, before loading the kayak.
First before even loading the kayak or canoe, double check the pack racks are secure and tight. (I have an Allen/Hex key in the glove box, so I don’t have to search through all the tools in the shed to find the correct size that fits.)
Also for long trips, multiple day camps and fishing trips, it is good to double check and tighten the racks and make sure it is secure to the car before loading the kayak again.
2. Load kayak so it is balanced evenly on the racks.
Place kayak so it is balanced on the racks.
If the kayak or boat is not place evenly to balance the weight on the racks, the wind resistance might put even more pressure on the racks causing it to put more stress on straps and the roof racks.
Placing the kayak correctly on the racks, taking into account the amount of overhang of the kayak on the front and rear of the vehicle, is a bit of a balancing act, so to speak. (Pun intended.)
3. Tie the middle straps first.
I normally tie the two middle straps first, as it levels out the load more evenly.
(As opposed to tying the bow or stern straps first, as it may tip the kayak up on an angle. Then when you tighten the middle straps, you can put too much tension on the load unevenly.)
The straps with cam buckles are better suited then the ratchet straps, as you can hand feel the tension. The straps with the ratchet mechanism gives you a lot of leverage and is very easy to over-tighten the straps without feeling it.
There are several ways to attach the two middle straps around the roof racks. The method I use is to make a u shape with the straps. They go under the roof rack and around the hull. Place enough tension so that it is firm and secure.
Do not over tension the straps so that you do not warp the kayak or canoe and damage the roof racks.

Above image, canoe on roof racks. Visit, Difference Between Kayak And Canoe.
4. Tie the bow line.
Front tie downs are important. The kayak can lift up from the air flow over the roof and under the kayak.
It also stops the kayak from going sideways once the bow front of the kayak starts shifting to the left or right from the wind resistance.
More traveling will push the kayak even further to the side creating more force and stress on the tie down points and roof racks. Also the vehicle will consume less petrol / gas if the kayak is tied straight on when traveling.
The front line can be tied down to the vehicles towing points or tie down points that are used when transporting the vehicle by truck.
Make sure the front rope/strap/line doesn’t get in drivers view and block their vision. A wide strap might be too thick, a strong line or thinner rope might be a better option. Obviously it has to be strong enough to help stabilize the load. The bow or front of the vessel can be fastened around the hull, scupper holes or through solid carry handles.
5. Fix the stern strap.
The back strap or line helps to secure the stern of kayak or canoe in crosswinds while traveling and also helps the kayak from sliding forward if you have to break hard for an emergency.
For kayak and boats overhanging beyond the vehicle, a bright orange/reflective safety flag might be required to tie it to the stern of the kayak.
This helps so motorists don’t run into the overhanging load.
(Check your country and state laws and regulations on overhanging boats and kayaks during transport.)
Scupper holes can also be used to pass the lines through.
6. Optional – Fifth strap for longer distances.
A fifth strap is an optional step for longer trips.
The strap might go under the car roof, between the roof and closed car door. This is extra fail safe measure for long trips in case the roof racks fail. (Using the strap between the doors, in some cars may damage the door seal or let water in.)
The fifth strap may or may not be required, but for a few minutes extra to tie it can give you piece of mind. Especially for long trips on the highways when passing oncoming large trucks and windy days, can cause stress on the roof racks and tie downs.
I have heard on the kayaking fishing forums that even some of the better quality brands of roof racks can fail. So maybe a fifth strap for long distances might be worth considering.
A fifth or even sixth strap might also be used for holding extra equipment like the paddles or oars, parallel alongside the boat.
7. Check the straps often when traveling.
Make it a habit that every time you stop for gas, toilet or food breaks, to go around the vehicle and check straps and ropes are secure.
Make sure it is safe to walk around the vehicle. If you don’t stop regularly, then schedule some stops to check the tie downs.
Check for loose straps and connections if traveling over bumpy or rough roads.
Rain, ice, the heat and cold temperatures can also affect the straps and lines/ropes as well as the actual kayak, roof racks, metal bucks or ratchets materials.
Contraction and expansion of plastics, metals, woods, materials can stretch or contract in cold or hot environments.
If in doubt while traveling, check the load is secure.
How to tie a kayak to roof racks. Tips when traveling.
With the excess tail of the strap I will normally do one or two half hitches to stop the strap fluttering about hitting the vehicle or kayak when traveling. (I have even cut the straps to suit the length of the load, so there is just enough tail end strap to be secure.)
Roof racks such as Rhino-Racks, Thule and Yakima are some of the popular roof rack brands and systems for transporting canoes and kayaks.
However some can be very pricey, so shop around for some sales. Some can even help load the kayak or canoe with extension bars and poles incorporated into the roof racks.
Be aware of some cheap copies of brand name roof racks.
Straps can be purchased from the hardware store, but go with a heavy duty strap rated high for load carrying.
Avoid the cheap budget straps as there is tremendous stress from the wind drag when traveling. Also the wind resistance can push the kayak up, putting more pressure on the straps and racks.
New straps and ropes can stretch more initially, so check shortly after ten fifteen minutes or so initial travel, if they have stretched or loosened.
When tying the kayak down, I will normally place the buckles on the passenger side of the vehicle. This is so I do not have go on the busy side open road.
I can check them safely and not be on the traffic side of the road, which has dangerous cars whizzing past. Safety first!
Always check your local state and country rules and regulations for transporting the kayaks and canoes. (Some straps in front of the driver’s window may not be allowed as they can block the drivers view. Metal “H” supports, welded to the bull bar or bumper bar that support the front of the kayak, could also be illegal in some states.)
Some people place soft material between the straps won’t mark their kayak or boat when transporting.
However when wet, the material can slide between the straps and loosen easier. Also be aware of the metal strap buckles scratching your car or kayak. Loose straps near the back windscreen can easily crack or smash it, position the buckles so they won’t accidentally hit the windows.
If the straps are vibrating and noisy while traveling, place a twist in the strap will reduce the noise. (However this may weaken the straps or buckle as it is twisted.)
Overnight when I stop traveling, I slightly loosen the straps, so there is no excess pressure.
Don’t forget to tighten them before traveling again.
Soft roof racks are a cheap option for transporting the kayak, however they may not be suitable for longer trips.
For an overnight stay or when stopped for a while away from the car, a bike lock, cable or chain with a padlock to secure the kayak to the racks, can help deter theft.
After the kayak has been in the water and before placing it back on the roof racks, try to wash or wipe down excess mud or sand off the kayak. The sand and dirt can get between the straps, kayak and car, and can rub causing damage to all three.
For information on kayak safety equipment and tips, click on – Kayak Fishing Safety Gear.
Conclusion. – How to tie a kayak to roof racks.
Check regularly and replace damaged or frayed straps as the weight of the kayak and wind resistance while traveling can be substantial. Have a spare strap or ropes, which can be used to replace frayed or damaged ones when transporting.
We hope you enjoyed the article and learnt how to tie a kayak to roof racks the correct way.
Stay safe and remember to wear a PFD when in the kayak or canoe.
