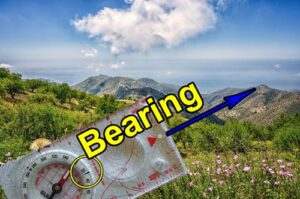
How To Use A Compass. Step By Step With Practical Examples. (And Pictures.)
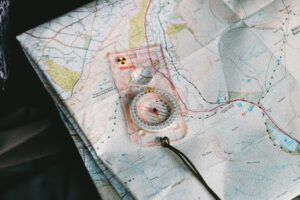
Navigation is an important tool and skill for camping and hiking. Whether you are fishing in the wilderness, or backpacking off the beaten trail, knowing how to use a compass is essential.
The cell phone, navigation apps and GPS (Global Positioning System.) are great for helping with navigation. However, they are not bullet proof and they can fail. (Read my story at the bottom of the article for an example.) A flat battery, no service, or the device can get wet or damaged are just a few things that can happen with navigational electrical equipment.
So a compass as a primary navigation instrument, or as a back-up tool is a good idea. But we have to know how to use the compass, so we can effectively navigate with it.
In this article we will cover with pictures:
Identifying the parts of a compass.
How to use a compass step by step, without a map.
How to use a compass with two practical examples. (Without a map.)
Using your compass to orient your map.
How to use a map and compass together. (With examples.)
Tips for learning how to use a compass.
Compass and navigation terminology.
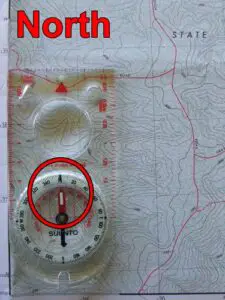
Parts of a compass.
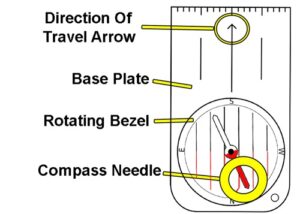
Before we learn how to use a compass, here are a few terms and names. So it will be easier to know what part of the compass we are talking about.
Base plate – A base plate compass has a clear plate that the compass is mounted on. This helps you see the map underneath it. The flat sides also help you plot a bearing. As an example, to line up point “A” to point “B”.
Compass needle – The compass needle points to the magnetic north pole. On most compasses the needle is normally red.
The needle can also be called the north arrow. (It is magnetic and is attracted to magnetic north, so it doesn’t point directly to the true North Pole.)
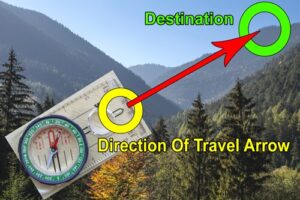
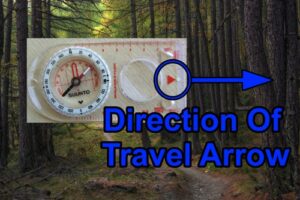
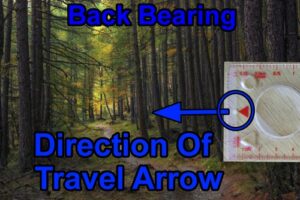
Direction of travel arrow or travel arrow – Used for pointing the compass to the direction you want to follow. Both on the map when working out the bearing and when travelling.
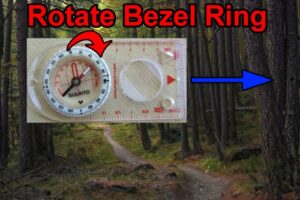
Rotating bezel: This might also be known as a bezel ring, compass dial, rotating dial, compass wheel, or azimuth ring.
The outer bezel ring is moveable and has 360 degrees marked on it. (Or, 0 to 359 degrees.) With the four main compass points of North, South, East and West, marked on the dial as N-S-E-W.
The 360 degree numbers are the compass bearing. (Military compasses have mills. They use 6400 mills for more precise compass bearings for artillery.)
The degrees go clockwise around the bezel.
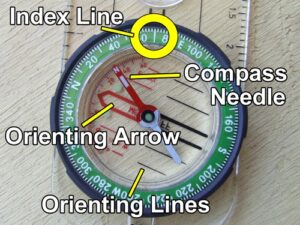
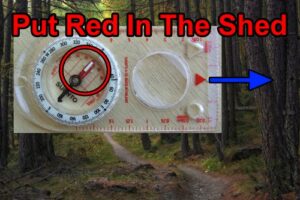
Orienting Arrow – The orienting arrow is where you align the compass needle inside it.
The compass needle floats above the orienting arrow. When the compass needle is lined up above the orienting arrow, this gives you a bearing on the index line. (This is sometime referred to as “Red in the shed,” or “Put red Fred in the shed.” A military saying is, “Putting the dog in the dog house.”
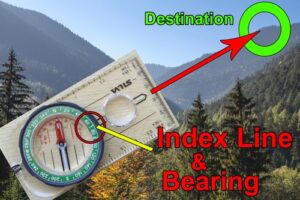
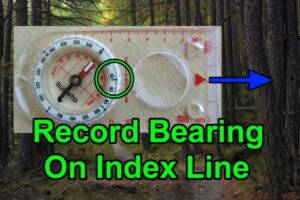
Index line – Also called a bearing index. The index line is where you line up your bearing.
As an example, your bezel ring might read 90°. When lined up on the index line and you align the north compass needle inside the orienting arrow, this would mean you are heading 90° or east.
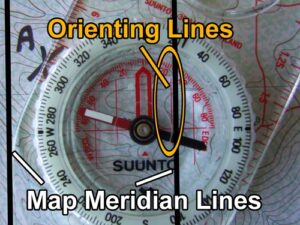
Orienting lines – Are used to help line up the compass with the north gridlines on a map.
How to use a compass, step by step. (Without a map. Taking a bearing.)
- Hold the compass flat in the palm of your hand.
- Point the travel arrow towards where you want to head to.
 3. “A” Rotate the bezel, “B” until the red compass needle is aligned with the orienting arrow.
4. “C” The index line will line up with the bezel ring number.
5. This number is our bearing.
6. When travelling, check frequently that you are still heading in the correct direction. By checking the red compass needle is lined inside the orienting arrow.
Points to remember.
- Hold the compass flat. If you hold the compass tilted an angle, the needle can get stuck and won’t work correctly.
- The red compass needle will point to magnetic north, regardless of what the bevel reads or where the travel arrow points. (As long as there is no metal to interfere with the reading.)
- You don’t just follow the direction that the red compass needle points. (Unless you want to just head north.)
- Three things have to line up before you can get an accurate reading.
- The travel arrow has to point in the direction we want to travel towards. The red compass needle then has to be aligned above the orienting arrow.
Two practical ways to use a compass without a map.
This is a similar step by step way as above, but just gives two practical examples on how to use the compass in the outdoors.
You don’t have to worry about magnetic declination, if you are just using the compass for a bearing by itself without a map.
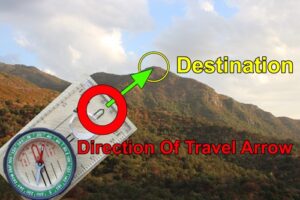
- Taking a bearing in the field. A point you can see and want to go to it.
The first way to use the compass, is if you can see a reference point you want to get to.
As an example, you want to hike to the top of the mountain. You can see the peak now, but in several yards you will be surrounded by the trees and forest and you won’t be able to see the mountain top.
1.Before you set off on the hike, hold the compass flat in one hand.
 2. Point the direction of arrow travel on the in line with the mountain peak.
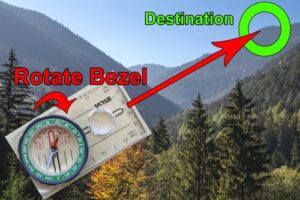
3. Rotate the bezel so the so the orienting arrow lines up with the north compass needle. Or “Red in the shed.”
![]()
4. As below photo: Take note of the bearing number lined up with the index line and write it down. (In case the bezel accidentally gets moved.)
5. When you are walking towards your mountain peak, but cannot see the top, point the travel arrow at a big tree, or something that stands out in the far distance.
Walk towards the tree. Once you have reached the tree, go around behind the center of it. Line up another prominent land mark or tree with the compass bearing and walk towards that. Repeat until you reach the top of the mountain.
Try to use a land mark that is a long way away in the distance. So you don’t have to constantly get the compass out all the time and check the bearing.
(If you are in very thick woods or jungle, you might have to refer to your compass frequently, to make sure you are on track. Making sure the compass needle is lined up with the orienting arrow.)
2. Using the compass for a general bearing to a place you cannot see. (Plus how to do a back bearing.)
Another way to use a compass without a map, it is to take a bearing in the general direction you want to travel to. But you can’t see a specific spot where you want to go.
As an example you are backpacking on a marked trail. It will soon be dark so you want to set up your tent. But you don’t want to camp too close to the trail, you want to go into the woods a bit to set up camp.
So you can use your compass to head away from the trail and then use it to find your way back to the trail.
1. Point the direction of arrow travel, with the direction you want to go.
2. As above, rotate the bezel ring.
3. As below image, place the orienting arrow in line with the compass needle. Or “Put Red In The Shed.” or “Putting the dog in the dog house.”
4. Record the number of degrees in line with the index line. (Bearing index.) As an example the bearing might be 44°.
Walk off the trail following the bearing, until you find a place to set up camp for the night.
5. The next morning you want to head back to the trail and continue hiking. So rotate the compass bezel 180 degrees (Half of a 360° full circle.) opposite what the bearing originally was. As we want to head in the opposite direction. This is called a back-bearing.
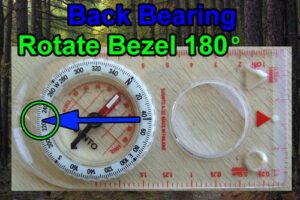
In this case, if the original bearing was 44 degrees, we set the new bearing is 224 degrees. (If you get confused, refer to the original written down bearing number.)
The 224° should be lined up with the index line marker.

6. Move your body so the compass needle is inside the orienting arrow. Or “Red in the shed.” Walk in the direction of the travel arrow until you come across the original trail.
Another way on how to do a back bearing. (Add or subtract 180 degrees.)
Another way to check if the back-bearing is correct is to add 180 to the original number if it is under 180 degrees. (As an example if the original bearing is 160°, add 180 = 340°. 340 degrees is our new bearing to head.)
If the original bearing is over 180 degrees, subtract 180 degrees. (Another example, if the original bearing was 260°, minus 180 = 80°. The new bearing to head back the opposite way is now 80°.)
The new bearing has to be 360° or under. If the bearing is over 360° we have made a mistake.
Navigation and compass tips for this method.
Taking a bearing with a compass is a good practice if you have to get off the trail to check something out.
Even if you think you will only walk off the trail a short distance. (It is amazing how many people get lost going one hundred yards off the trail into woods to go to the toilet. It is easy to get disorientated.)
Take a note of how far you go into the woods from the trail. You can count your paces or use “Ranger beads.” (Also known as pacing beads.) This gives you confidence in your navigation skills and is good practice.
As an example you went roughly 400 yards from the trail into the woods, then you have to travel back 400 yards to get back. Allowing for lateral drift.
A navigation tip is to also be aware of where the sun is in relation to you walking into the woods, off the trail. Also be aware of any prominent landmarks or large unusual trees.
When you are walking off the trail, it is also a good idea to look back every so often and get a picture of what the terrain is like. Then when you are walking back towards the trail you know what is looks like.
Be careful that the trail doesn’t have a dog leg in it and you wonder off the bearing and then miss the trail. Take note of any hills, mountains rivers or prominent features around you, that can help you stay on the bearing.
Ideally you should have a map as well.
You can also use this method if you are trying to find a fishing spot. On the trail you know there is a river running parallel to the trail, or a large lake. Take a bearing from the trail. Walk until you get to the river. When you want to head bake, take a back bearing. Be aware that you might go up or down the river when fishing, so you might be left or right of the spot when you head back.
This navigation tip is probably better for an experienced navigator. But a quick way you can find the opposite bearing without doing any math’s is to place the red needle on the original bearing. (Don’t worry about “Red in the shed.”) The opposite end of the red magnetic needle, is the white or black, south needle. This will point to 180 opposite of the original bearing. In this case the original bearing was 44 degrees, so the south end of the needle will point to 224 degrees. Rotate the bezel until the new bearing is 224° in line with the index line. Then put “Red in the shed.” and this is your new bearing to walk, until you hit the hiking trail.
What is magnetic declination?
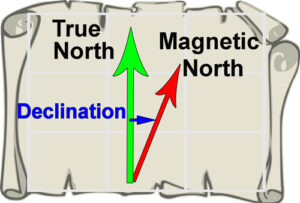
The compass needle doesn’t point towards the true North Pole, but instead points at the magnetic north pole. (Which is in North East in Canada.)
“Magnetic declination” is the difference between magnetic north and true north. It can be west or east depending where you are.
Over time the declination changes.
Maps list the declination and it will generally be in the legend section. It might show two north arrows consisting of: True north and magnetic north.
On some maps it might list three norths. True north, magnetic north and grid north.
(Grid north might also be called map north. Grid north is close to true north. The earth’s 3D globe is tried to put on a flat 2D map, so it will be out slightly. )
On the map, as an example it might read 11° west. So adjust the declination for 11° west to your compass bearing.
Make sure you check the date of the map. If the map is old, the magnetic declination can change a lot, so it is better off checking online with the National Oceanic and Atmospheric Administration. (NOAA)
For compasses that don’t have an in-built declination adjustment, you have to manually adjust the declination each time you plot a bearing.
With compasses that have a declination adjustment, you can set them once and forget them. (Such as a Suunto MC-2 Global compass.) Unless you go to another completely different area for navigation, then you have to adjust it again.
How to orientate a map.
Orientating the map first will give you a better sense of direction. As you can relate to features on the map and with your physical surroundings.
1.Place the map on something flat. Like the ground, flat rock or picnic table. Free from any metallic objects.
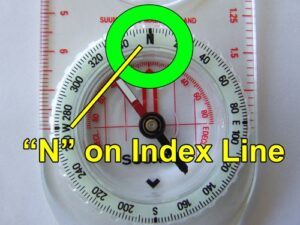
2. Rotate the bezel of the compass, so it reads “N” north (or “0”) over the index line.
3.Adjust the magnetic declination on the compass if it needs adjusting.
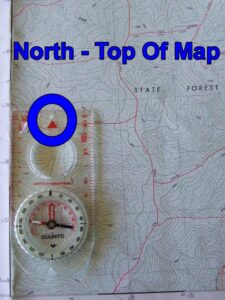
4. Place the compass so the direction of travel arrow points to the top of the map. Which on 99% of maps is “North” most
 5. Align the compass edge on one of the meridian map lines. (The north / south grid lines.) or on the bottom corner of the map.
 6. Rotate the map with the compass both together, until the red magnetic needle lines up with the orienting arrow. The meridian lines are running north / south and the top of the map is north.
Double check the direction of travel arrow is pointing to the top of the map and the compass and map is in line.
How to use a compass and map. (With orienting the map.)
1.Place the compass on the map and orientate the map. (As above steps.)
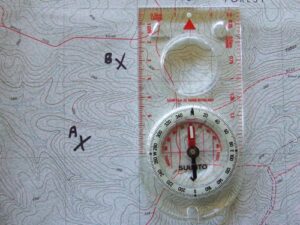
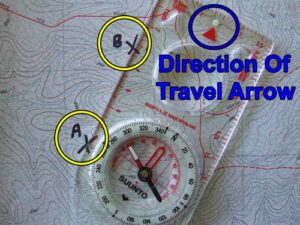
2. Line up the edge of the compass from the location where you are, to the spot you want to go. As in the photo below from point “A” to point “B”.
 3. Make sure the direction of travel arrow is pointing towards where you want to go. (From “A” to “B”.)
4. Rotate the bezel ring until the orienting arrow is lined up with the compass needle as below image.
5. The bearing number will be aligned with the index line. Take note of this number and record it.

6. With the compass needle still aligned with the orienting arrow, sight the direction of travel arrow to a prominent feature and walk towards that spot.
7. Repeat until you reach your destination.
Double check when the compass is on the map, that the travel arrow is pointing the right way. Such as going from “A” to “B” not the other way round. Also the red north magnetic needle should be facing to the top of the map.
2. How to use a compass and a map together. (Without orienting the map.)
This second way, is a quicker method to get a bearing. It is like the Silva 1-2-3 system.
However, the first method with orientating the map to north, is a good practice to begin with. As it can help orientate you and also reduces your chance of making a navigation mistake.
This is where this method is different from the orientate the map method. We are going to use the orienting lines to line up parallel with the meridian lines on the map. (Longitude lines that run north and south.)
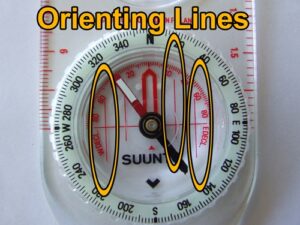
We don’t have to worry about putting red in the shed or aligning the orienting arrow up with the north compass needle. As the orienting lines when matched up along the map grid lines are running north.
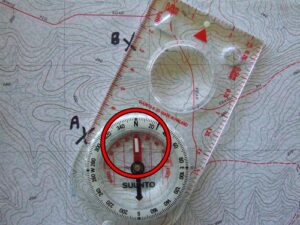
1.Adjust the compass for the magnetic declination. Place the compass on the map. Line up the edge of the compass from where you are at point “A” to where you want to go, to point “B”. Make sure the direction of travel arrow is indicating towards the correct way on the map.
2. As per below photograph. Rotate the bezel ring until the orienting lines are running parallel to the map grid meridian lines.
3. The index line will mark the new bearing as the image below.

4. Hold the compass flat in front of you at waist to chest level. Turn yourself so the compass needle is in the orienting arrow.
5. Sight the travel arrow on the compass to a landmark as above. Walk towards that point while maintaining your direction.
6. Repeat until you reach your end point.
Recap – When the compass is on the map, you don’t have to line the compass needle with the orienting arrow. As the orienting lines that run north are lined up with the map’s meridian lines. Or north / south longitude lines.
Double check that the orienting lines and orienting arrow is facing north on the map and running parallel to the map meridian lines.
Other parts of a compass.
Clinometer – For measuring vertical angles of hills.
Magnifying glass – A magnifying glass can help you read fine map details and icons.
Lanyard – The lanyard can hold the compass around the neck, some have breakaway attachments so the lanyard will come apart if it gets tangled. Lanyards might also have increment marks on it, to help measure distances.
Luminous marks – Some orienting arrows and compass needles have luminous marks around on or around them to help you navigate at night. By shining the torch, the marks can glow and easily be seen.
Romer – A tool to help find a grid reference.
Rulers – The side of the base plate has a ruler and a map scale. Which can help you measure a distance on the map.
Sighting mirror – A sighting compass with a mirror can help line up land marks.
Tips for learning how to use a compass.
Don’t use the compass near anything metal. Like a belt buckle, knife, watch, metal hiking canteen, etc. The metal can affect the compass and give you a false reading.
Be careful if you do place the map on the bonnet of your car, as the metal can affect the reading. Be mindful inside the vehicle as well, as it can upset the reading.
A cell phone close to the compass will also affect the reading.
Even if you are inside a building and cannot relate to any landmarks outside, orientating the map to north is good practice.
Some compasses have an adjustable declination that you set for your area. After you have adjusted it, you don’t have to add or subtract the degrees. If you travel to other areas, you will have to adjust it.
If you are learning how to use a compass for the first time, try the park, or somewhere that the land area or forest isn’t too big.
Go somewhere that has an area with some prominent major landmarks and features that stand out, so you won’t get lost. Places with a highway one side, some hills or mountains the other and a major river can help you orientate yourself easier with a map. These boundaries “stoppers” and “hand rails” will stop you going too far and getting lost.
Avoid going deep into the backwoods until you get confident in your navigation skills.
In 99% of maps, the top of the map will be north. The map might have a compass rose, indicating north, or a north arrow.
So you can double check your direction when plotting, know that the compass bezel is divided up into sections of the 360 degrees. North is 0°, East is 90°, South is 180°, and West is 270°. This information can help check your bearing quickly, knowing that the bearing will fall between these cardinal points and you are heading in that general direction.
If the magnifying glass on the compass is strong enough, it can be used as an emergency solar fire lighting tool. The strong sun has to be out for it to work. Also the tinder used does have to be very fine and dry. But can be a sustainable way of lighting a campfire in sunny conditions.
A sighting mirror compass can be used for an emergency signal mirror to alert search and rescue where you are.
The mirror can also be used for first aid, such as to see any foreign objects in your eye.
If you have a map spread out and it starts to blow away, place some pebbles on the corner of it. Use a plastic water bottle and any heavy object to hold the corners down.
Most compasses are either designed for the northern hemisphere or the southern hemisphere. The needle is balanced and weighted differently. However if you do travel to different countries, you can get a global compass such as the Suunto MC-2 Global compass, that will work in both hemispheres.
When you pull up in your vehicle at your starting spot in the woods, ready to go hiking, camping or hunting, first find the cardinal directions. Take your compass out and see where north is. Take note of the sun (Knowing the sun will move.) and if any major landmarks are about.
Avoid buying the cheap no brand name compasses. The low quality compasses might leak and eventually won’t give you accurate bearings.
Stick with known brands such as; Suunto, Silva and Brunton. Camegera also makes the lensatic military compasses. While some of the good brands and models can be expensive, you can find some on sale. Amazon, REI, eBay, local outdoor fishing and hunting shops are worth checking out for some deals and sales.
How to check that the compass is working?
A lot of times we might doubt the accuracy of the compass, so there are a few ways to check it is correct.
We can have a backup compass. We might carry one in our pocket and the spare compass in the backpack. Double check they both point the same direction. Don’t place them side by side as they will give a false reading.
We know that the sun rises in the east and sets in the west.
(Technically it can rise from south east to north east depending on the season. And the sun can go down from the north-west to the south west.) But knowing the generally direction of the rising and setting sun can give us confidence that the compass is accurate. Or at least, an approximate direction.
Also during the solar noon, which means the sun position is the highest in the sky. (It will be roughly around 12 o’clock midday, but not exactly at this time, as it changes.) In the northern hemisphere, when the sun is highest, it will be in a south direction.
In the southern hemisphere, the sun at solar noon is in a northerly direction.
Stars are another way to check if the compass is accurate. If we are in the northern hemisphere, Polaris will indicate north.
For the southern hemisphere, the Southern Cross will help confirm south.
There are other stars and pointers that can help our terrestrial navigation as well, but with Polaris a lot of people are familiar with it.
“I can’t say as ever I was lost, but I was bewildered once for three days.” Daniel Boone.
Navigation and compass terminology.
Back bearing – Going in the opposite direction of your original bearing. If you go one way, you can set a back bearing to head back.It is 180 degrees opposite of the original bearing.
Bearing – The direction in degrees.
Cardinal directions – Are North, South East and West. It can also be called the cardinal points.
Declination – Is the difference between true north and magnetic north.
Taking a bearing – Is an angle of direction, going towards where you want to go.
Lateral drift – When you go of course to the left or right. It might be from going around trees, a pond, or veering off to the side when going up a steep hill.
What is a lubber line? This is the index line or bearing index, where you line up the bearing number.
Why Should I Use A Compass?
Okay I have to admit, I have been geographically embarrassed (Lost.) more than a few times.
I remember setting out, early one morning in the pitch dark to walk to a fishing spot about a mile away from the car. I had my GPS, but no compass. After about walking 200 yards, the GPS cut out. The night before I replaced the batteries, so I knew it wasn’t flat batteries, but the GPS just crashed.
In the dark I walked around in a circle and completely got lost. The stars were covered by clouds, so I couldn’t use them to help navigate. I had to wait until daylight so I could see where I was, eventually I got to the fishing spot.
However, I shudder to think what could have happened if I had been in a remote spot and the weather turned awful. It could have even been a bad situation, instead of some precious fishing time lost.
Since then, I always carry a map and a compass and started relying less on the GPS. Now that I have done that, I am finding I am more aware of natural navigation signs as well. Things like the position of the sun and the stars, etc.
So, why should you use a compass?
I think one main reason to use a compass, besides being less reliant on technology that can fail, is you start using your brain more. (My wife would laugh at that one and disagree.)
It gets you more in tune with nature, you start taking notice of the cardinal points. You start observing which way the bigger tree limbs are growing towards. You now take notice, that one side of the hill has more vegetation then the other side.
The stars and moon are not just pretty lights in the sky. But can help you navigate. You start wondering how early sailors navigated across the vast oceans, without getting lost.
Using a compass is a stepping stone to natural navigation methods. You appreciate just a bit, of how the earth functions. How the sun, stars, weather and nature work together.
Conclusion. How to use a compass.
There can be a lot to learn when navigating. But by breaking it down, step by step by step, you can learn how to use a compass with some regular practice.
Remember to not only have a backup compass and map, in case the GPS fails, but know how to use a map and compass.
Navigation resources and references.
https://www.ngdc.noaa.gov/geomag/calculators/magcalc.shtml?#declination
Silva 1-2-3 system.
The Natural Navigator, by Tristan Gooley.
Be Expert with Map and Compass, by Bjorn Kjellstrom.
National Oceanic and Atmospheric Administration. (NOAA)
