Tripod Uses For Bushcraft And Camping.
The tripod has multiple uses for bushcraft and the outdoors. With just three poles and some cordage, it is easy to build. The tripod can support a lot of weight with the right size poles and correct lashings.
Here are some tripod uses for bushcraft and camping.
1. To support a ridgeline for shelter.
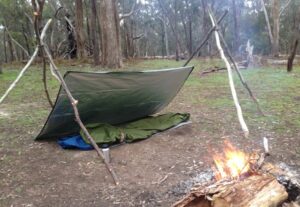
You can use a ridgeline or place a pole between two tripods to hang a tarp over it for shelter. (Ideal if there are no tress about. Or dangerous widow-makers limbs above.)
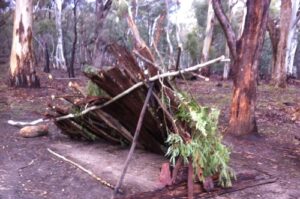
Or simply use one tripod for an angled shelter structure. Either a natural debris shelter or a tarp set up.
A plough point, or diamond tarp shelter can be attached to the tripod as well.
Two solid tripods with staked guy lines can also be used to suspend a hammock.Also a stretcher type bed can be made by using a tarp or poncho wrapped on horizontal poles and braced either side of the tripods.
2.Camp tripod chair or stool.
The tripod can be turned into a full size bush chair or smaller stool camp chair. Canvas or a tarp material can be fashioned into makeshift seat and placed on the tripod.
Alternatively you can buy a commercial designed bush chair like the Hidden Woodsman Wilderness camp chair. Or an Opossum Perch camping stool from Self Reliance Outfitters.
3. Use as a tool rack.
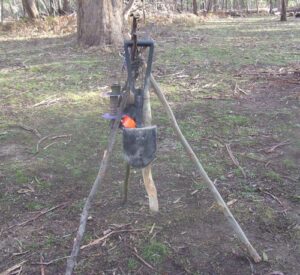
Pictured above: Hanging off the tripod is an army folding shovel, baton, Mora knife, Bacho Laplander saw, numerous types of cordage and Gorilla tape.
Use the tripod as a rack for camping, you could hang items like, hatchets, buck saws, batons, canteen, etc. The tripod also keeps the items off the wet ground and easier to pick up.
Depending on the size of the tripod and the crown of the three posts, it can also hold a day pack or haversack in it.
4. Meat drying rack for jerky.
The tripod is ideal to help game meat air dry for making jerky or biltong.
Wrap some thin cordage horizontal around from tripod leg to leg. If you have a lot of meat to dry, create a spider web effect between the tripod legs. Or thread the meat onto thin wire, fishing line or bamboo strips.
Hang thin slices of game meat like venison along the cordage as a drying rack. Ideally no thicker than ¼“, (About 6mm.) and about 1” (25mm.) wide, to help dry the strips.
Ideally, make sure the tripod rack is in full sun to help dry the meat. If it is hot and sunny, the jerky might take a day to dry. Otherwise it might take two or three days. If conditions are damp, smoking the game meat might be an option to preserve it.
The jerky can also be hydrated back into stews and soups. Or pounded and shredded up to help make pemmican.
5. Field dress game.
If there are no suitable limbs about, a larger tripod can be used to hang and help field dress larger game like deer.
As well as it gets the game off the ground making it cleaner, it is also easier on the back to field dress the game.
6. Tripod and crane support for camp cooking.
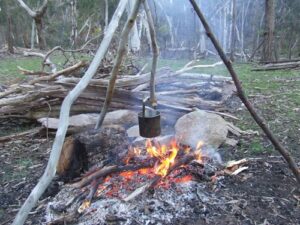
The tripod is not only ideal for hanging the billy pot over the camp fire, but a smaller tripod can be used as a support base / pivot for the pot crane to lean against.
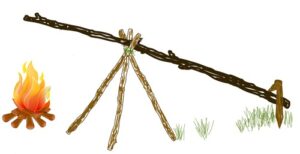
To use, place the smaller tripod off to the side of the fire. Place the crane pole diagonally across the tripod. Use a weight, like a log, rock or an inverted “Y” or figure “7”stake to secure the end of the crane. (Dig the tripod legs in the dirt a bit, or cut a point on the tripod legs so it doesn’t collapse with the weight of the crane pole and billy pot.)
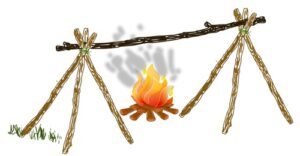
You can also use two smaller tripods either side of the fire. Use a pole spanning from one tripod to the other, to suspend a pot over the fire.
You can adjust the height of the pot hanging, by spreading the tripod legs out for a wider base or in, to raise it. Visit Campfire Cooking Tips for more information.
7. Signal fire tripod
The tripod is an ideal platform for a signal fire. The tripod helps keep the dry fuel up high of the ground, where the air can circulate and help burn the signal fire.
Three signal fires are generally set up in a triangle formation, which can stand out more for search and rescue aircraft.
8. Tinsel tripod
The tinsel tripod is used in an emergency situation. This idea is from Bob Cooper’s book, Outback Survival. (A good read by the way.) It is basically a tall tripod with bright and / or shiny objects attached to it, to attract attention for search and rescue parties.
Tie high up on the tripod, bright bandanas, colored dry bags, strips of surveyors tape, space blankets pieces, etc. Or anything shiny like potato crisp packets, or shiny pieces of soda cans to stand out and attract attention.
8. Umbrella to protect the fire.
When it is raining, the precious fire can be protected underneath a tripod shelter. Place branches like spruce boughs, or wide bark on top of tripod to make an umbrella to protect the fire beneath.
9. Clothes line hanger.
To air out my hunting clothes on longer trips, I sometimes will hang my shirt and jacket on a tree limb or shrub. The sun light helps kill the bacteria and make the clothes fresher.
However, hanging clothes on tree limbs can sometimes invite spiders or bull ants. Even if you shake the clothes and inspect them before putting them back on, sometimes you can miss some nasty stinging insects. Another alternative is too hang them on the tripod in the sun. The advantage of this is the tripod can easily be moved and placed in direct sunlight.
As well as airing the clothes, the tripod makes a crude clothes line to dry out a couple of clothes if wet.
The tripod ends can be used to slip socks, boots upside down or gloves over them to dry them out.
A green wood tripod can be located over a fire to help dry out clothing. Obviously don’t hang the clothes too close to the fire. Also, make sure the wind isn’t going to blow the clothing off into the fire.
10. Hang a water filter from it.
The Millbank Army filter bag or Brown filter bag is ideal to hang off the tripod.
Place a stainless steel water bottle or cup underneath the filter. Once the bottle is full, sterilize the water by boiling or a chemical treatment.
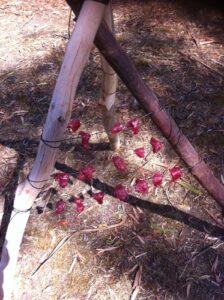
11. The tripod lever.
A while ago I watched a good YouTube video on a mechanical advantage system by Survival Sherpa. He made a pairing ladder, which is basically a bipod made with two strong poles and a brace between them. The log is dragged along by using body weight to lever down the top of the “A” frame poles.
One camping trip with the kids, I decided to put the idea to the test. I already had a tripod fashioned up, using it for a ridgeline. So I thought instead of making an additionally bipod, the tripod should work in a similar fashion. Just by moving the third leg out of the way.
I used a car tow strap to connect around the log to the tripod. I gripped the top of the tripod poles high up and used my body-weight to lean back, pivot and drag the log along.
It actually worked okay, and when the log wasn’t being moved the tripod stood up, ready to go again. The tripod third leg didn’t get in the road as much as I thought it would. You just move the leg out the way you are going.
If you were doing a lot of heavy moving, obviously a dedicated pairing ladder structure, with a sturdy brace across it would be better. However the tripod design worked fine as I already had it.

To move bigger logs then in the picture above, a stronger thicker diameter poles would be used and stronger lashings. You could also combine rolling logs on the ground, for the heavy item to slide on.
12. A base for a tipi or wikiup type shelter.
A tripod made with larger poles can be the base structure for a tipi or wikiup style shelter.
Add additional poles and weave some horizontal cordage, roots, or natural cordage in for strength. Layer it with a tarp or natural debris like bark, leaves and moss and you have a shelter.
13. Tripod table.
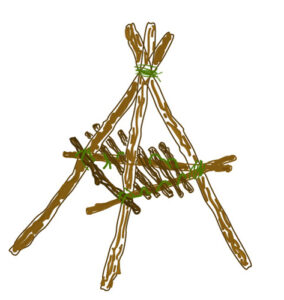
By securing some cross members to the tripod legs, a makeshift table can be made. (Or lash four poles together for an easier base.) The table makes items easier to pick up and helps keep food off the ground and away from ants, etc.
A bandana horizontally tied across the legs can also be used as a loft. Or several pieces of paracord strung in a horizontal spider web type fashion for a gear hammock.
Alternatively, place flat bark or large leaves for the table top on the cordage type hammock for a filled in platform.
For longer tripods, two or three layers of platform bench can be crafted.
14. Primitive smokehouse.
The tripod can be used as an improvised smoke house for smoking game meat or animal hides, to help preserve them.
Use green branches for the tripod legs. Wrap some tarp, canvas or hide around the tripod and place over a small fire for a smokehouse.
Be careful you don’t use resinous limbs and leaves and try to get the fire too big or smoky. Otherwise it will tint the meat with a bad flavor.
Summary – Tripod uses for bushcraft and camping.
The tripod is quick to set up and requires minimal equipment to build. It has numerous uses for bushcraft, longer term wilderness living, or just simply hanging the billy pot over a camp fire for a coffee.
For hints, outdoor hacks and tricks, visit – Camping Tips.
