Winter Bushcraft Tips.

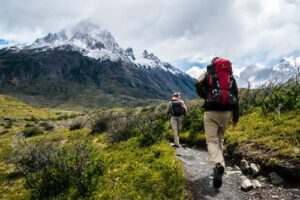
Winter can be unforgiving and harsh in some regions. Here are a few winter bushcraft, camping and survival tips that can help keep you drier and warmer.
For normal camping, extra camping hints and tricks can be found by visiting – Camping Tips.
1. Avoid sweating.
Don’t over-exert yourself. If you start sweating and then stop moving, you can get wet and cold easily, which can lead to hypothermia.
Wear the correct minimal clothes while walking or doing physical chores. Pace yourself, then add the layers when you stop moving.
Survivorman, Les Stroud has a saying, “You sweat, you die.” A confronting statement that is true in the winter cold.
2. Collect dry tinder when the opportunity arises.
Have a mindset that it you may not find any suitable tinder tomorrow for fire making, so collect it when you can. It could rain flat out for weeks, so any good tinder that is available should be gathered. I have heard the term mentioned by Dave Canterbury, as the next fire mentality. This approach could be also used and useful for gathering water, food or making charred natural material.
3. Dry the tinder.
If your tinder is damp, place it in your pocket where it can warm up and dry. Or place it under your jacket or in a bandana, close to your body. Be careful it is not too close to your skin as may make it damper. Place tinder and wet firewood next to the fire to dry out.
4. The importance of sleeping matt or bough bed.
For keeping warm at night, especially in winter, a sleeping matt is vitally important. Something to sleep on stops the ground conducting the cold to your body and draining the heat away. A sleeping pad or natural materials like a bough bed can be made to stop the cold conduction. Leaves, small branches, pine needles, bracken fern, grass, etc. can be layered on the ground for a mat.
I recently used an emergency bivy bag to field test it out and do a review on it eventually. (Deliberately with no sleeping bag or pad or fire.) I had plenty of warm clothes on, a thin bivy bag, a Grabber All Weather Space Blanket underneath me and a DD tarp (3m x 3m) also folded underneath. The DD tarp was set up as a lean to tapered shelter. With no sleeping matt separating me from the ground, I knew it was going to be a cold, awful night.
Overnight the temperature dropped to about 2 degrees Celsius (35.6 Fahrenheit) on my trusty thermometer. (For some colder climates, 2 degrees Celsius is a heat wave, but for me it is cold.) Even with my clothes on, two layers of tarp and the bivy bag underneath me, I could still feel the cold ground sapping my heat away.
As predicted it became a miserable night. Gee, I was glad the next morning when the sun come up. Besides my unscientific testing of the bivy bag, the test refreshed two important bits of information that I already knew:
- I am stupid for doing this. I knew it was going to be a cold night with no matt or bough bed. (But in my defense though I did want to test the bivy bag without a mat and sleeping bag.)
- The key point here is to never underestimate the importance of placing something decent between the cold ground and your body.
If you combine just one more factor like, wind, rain, colder temperatures, inappropriate wet clothing with the cold ground, you have a recipe for a disaster.
5. Improvised hot water bottle.
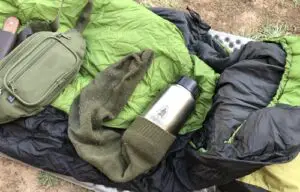
For a makeshift hot water bottle, heat up some water and place in a stainless steel water bottle. It has to be a single wall bottle.
Place the bottle in a thick sock and place in sleeping bag for a hot water bottle. This also allows you to have water in the morning that is not frozen.
Depending on size, type, design of stainless steel bottle and temperature, the bottle may be warm for around four to seven hours or so, or longer. For my wide mouth Klean Kanteen stainless steel bottle, after about four or so hours, I remove the sock partially to expose more heat from the bottle.
You could also use a shemagh, article of clothing or two bandanas to put the hot water bottle in. (Obviously be careful with boiling water. Make sure the lid is on properly and the bottle won’t leak. As you don’t want to burn yourself or wet the bedding.)
Another tip, if it’s really cold, use two bottles.
6. Insulate clothing with natural materials.
If caught out with inappropriate or minimal clothing, stuff clothing and hat with dry leaves, grasses, etc., for insulation. Some insulation may be itchy, but at least it helps trap the air and can keep you warmer.
7. Cover the head and hands.
A lot of heat is lost around the head and neck area. Wear a beanie or balaclava, shemagh or scarf to keep warmer. Gloves are a good idea and a necessity for some cold weather climates. If you don’t have any gloves, wear a pair of socks over the hands to keep them warmer at night.
8. Warm it up.
Have you ever put on frosty cold clothing on first thing in the morning, not fun. Place some of your clothes in the sleeping bag and they will be warmer to put on the next morning. For roomier, bigger sleeping bags, this also minimizes the cold air space. The other option is just sleep in your clothes. (But it is nice sometimes to peel off the layers, especially if the clothes are dirty or damp.)
9. Upside down water bottle.
Place water bottles upside down so they freeze at the bottom first. This helps pouring the water out, since the top of the water level in the bottle hopefully won’t be frozen.
10. Zip it up.
Zip up your sleeping bag when going to the toilet at night, or at least fold the bag top over. This will keep some warmth in the bag from leaking out. Or another option is to have a wee bottle, so you don’t have to go out in the uncomfortable cold. (For hot nights in a tent, this also reduces the mosquitoes and bugs getting in the tent, as you are not unzipping the mesh. Also it stops you from stumbling around in the dark and potentially stepping on nasties, like scorpions, etc.)
11. Hard H20 Prepare your water.
For freezing conditions, fill the billy tin and water bottles with water before going to bed. As it is harder to pour frozen water, but easier to thaw out when already in the containers.
12. Para cord loop.
Zips can be hard to open if you are wearing thick gloves or your hands are cold. To make the zippers easier to open, place a paracord loop (or ring.) on sleeping bags, tents, back packs, etc. Make sure that the loop is not too big on your back pack. As the loop it can snag on bushes, going through thick brush.
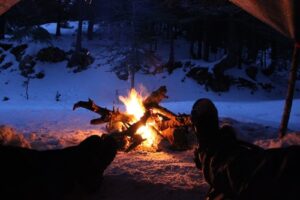
13. Collect more wood.
For cold winter nights collect more fire wood during the day then you think you will need overnight. The colder and damper the weather is, the more wood you may need. For some of the extremely cold climates you might have to double or even triple the amount of firewood you think you need for the night.
14. Clothing is your first line of defense.
While everyone seems hung up on the latest high tech survival kit, BOB (Bug out Bag.) or expensive custom knifes, people forget that layers of appropriate clothing are vital for cold climates. Even if the temperature is fine during the day, pack an extra layer or two for the cold winter nights.
I have been in regions where it can be nice and sunny weather during the day, but at night drop to below freezing. I’m sure our readers can mention places where they have three or even four seasons in one day.
15. Multiple fire lighting sources.
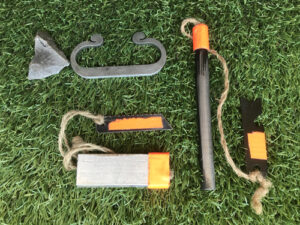
Have at least two ways of making fire, perhaps three or more methods.
You might have a ferrocerium rod, cotton balls and a Bic lighter. Or matches, lighter and magnesium block. Maybe some extra cordage for a bow drill, friction fire as well.
Remember though, the colder and wetter the conditions, the harder it is to start a fire. Practice with your fire lighting kit during good conditions.
Please be aware that all fire lighting methods have advantages and disadvantages. An advantage of the lighter is instant flame. However a drawback of some lighters is they are susceptible to the cold. (Warm up the lighter under the arm or rub it to warm it up.)
A drawback of the ferrocerium rod is, that a spark won’t work on all woods. Some woods need a lot of processing to take a spark. Other woods just won’t work, no matter how much it is finely processed or dry it is.
Test your local woods in good conditions, before relying on them in bad weather for fire lighting. A good idea is to have a ferro rod in combination of natural tinder and man-made. Like fat wood, birch bark, cattails and some cotton balls in Vaseline. Or a brought commercial fire starter, like the Fire Strip Roll, Pathfinder Mini Inferno Fire Discs, SERE fire strips, etc.
Many moons ago when I was young and dumb, (I can hear my wife say, the later one is still the case.) I went camping and I just had one fire starting method, matches. The matches were brand name ones that were supposedly water proof. I went to light a fire and the first one disintegrated in front of my eyes. The second and third match fell apart as easy. Twenty five matches later and I was sweating and cursing. The whole pack later and no fire, and no hot meal.
The matches were a brand new pack and not damp. I am not sure why they disintegrated, perhaps they were a bad batch. The point is relying on only one way to start a fire is wishful thinking, not good survival or bushcraft skills.
If you are not sure what is the diference between a flint and steel and a ferrocerium rod, click on, What is a flint and steel & ferro rod.
16. The importance of coverage.
A small reflective tarp or poncho should be in your survival kit. This can make a temporary shelter quickly, that can keep you out of the wind or rain in unforgiving conditions.
While you can certainly make a debris shelter or hut, however this could take from an hour to half a day, depending on resources, size and set up. In very harsh winter weather, if you are injured, such as having a twisted ankle, making a debris shelter may not be an option.
A tarp or a poncho is a versatile shelter and can be lifesaving from the elements. It can literally be put up in minutes.
Some other brands of tarps that might be worth looking at are the Arcturus Heavy Duty Survival Blanket, Grabber All Weather Space Blanket, S.O.L Sport Utility Blanket. Or the new Pathfinder Survival Blanket, which looks good value.
Ponchos like the Helikon brand, or quality military spec ponchos, have eyelets that can help fasten it between points for a shelter. They are also more durable than the cheap thin department store ponchos and are more versatile.
17. Improvise, under the tree shelter.
If caught out in the rain, the old stand under a tree is good advice. But only if the branches and leaves are thick enough to shield the rain. Look for the dry ground areas under the trees. If you look straight up under the tree, the better trees will have a cover of leaves and branches that will to block the light out. These trees can help shed the rain.
18. Spare change of dry clothes.
An extra set of thermal underwear, or a change of clothes placed in a dry bag or zip lock bag is a good idea. If you do get wet, you have a change of dry clothes for the night.
Hope you enjoyed the winter bushcraft tips for keeping dry and warm. What are your tips and tricks for the cold winter outdoors?
